If you think of Microsoft PhotoDraw as an artist's studio, you'll find it easy to understand how the PhotoDraw interface works. For example, your artist's canvas, or the area you use to create your picture, is called the workspace in PhotoDraw. You create, customize, and combine individual design objects on the workspace to make pictures.
The PhotoDraw interface includes the following features:
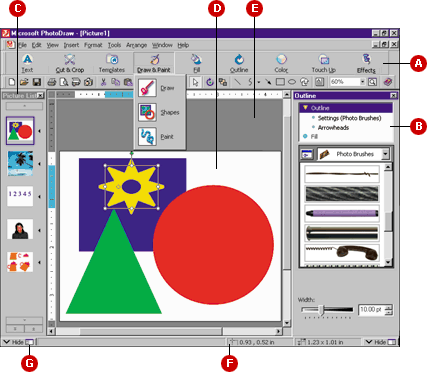
Visual menu Located between the menu bar and the standard toolbar, the visual menu (A, above) provides easy access to the design tasks you'll use in PhotoDraw. About the visual menu
Workpanes When you click a task on certain menus or toolbar buttons, a workpane appears (B) that displays the tools and options you'll need for a specific design task. About workpanes
Picture and object lists Located to the left of the workspace, the picture list (C) shows you thumbnail versions of all the pictures that are open during your PhotoDraw session. You can open an object list for each picture to quickly copy objects or change their front-to-back order in the workspace. About the picture list
Picture area The white rectangle that appears in the center of the workspace is called the picture area (D). You can change the size, color, and other attributes of the picture area. Ways to set up the picture area
Scratch area The gray area that surrounds the picture area is called the scratch area (E). You can drag objects onto the scratch area and then move them onto the picture area as you need them. About working with objects on the scratch area
Status bar The status bar indicates the position and size of selected objects in the workspace (F). If nothing is selected on the workspace, it shows the position of your mouse cursor and the size of the active picture. The status bar also contains buttons that let you hide or show a workpane or the picture list (G). Items that appear in the status bar